|
|
 |
|
Lesson 4 - Colour and Highlights Added on: Sat Jan 06 2001 |
| Page: 1 2 3 4 5 6 7 8 9 10 11 |
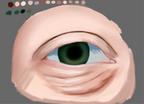
As I've already mentioned this eye was meant to be a male in the age 25 to 35. The amount of wrinkles is of course different from person to person, but at 35 you will at least have some wrinkles (Hell even I got some, especially after 3 'all-nighters' with the computer :-)) As you can see in the image below I've started to suggest some furrows in the skin below the eye.

More colors to the skin and starting furrows below the eye.
Smooooth
Next step is to smooth those colors out. Use the Just add water tool for this. Experiment with different sizes in different areas. You should leave some areas more rough than others. As an example I left the area below the eye a little more rough (because of the wrinkles we're going to create here). For the rest of the skin you should work with the water tool until you have all the colors blended. Also smooth the dark crease above the eyelid and the iris.
 
Skin smoothed and iris and eyelid crease smoothed
Although the colors look OK in our painting, it virtually screams for more detail. As always with the water tool you should smooth & refine, smooth & refine etc. I think this is a great way to work because you can see just how much detail the painting needs. Instead of painting with full detail from the start, you start on rough and add more and more detail until it looks good. There are other reasons for starting rough too...
Use the airbrush (or any other tool you fancy) to add more detail. Also start thinking about lightning. For shadows and highlights I've pictured the light being placed in front and above our eye.
Wrinkles and lightning more defined.
|
 |
|
|


