|
|
 |
|
Advanced IK Setups Added on: Thu Aug 03 2000 |
| Page: 1 2 3 4 5 6 7 8 9 10 |
Ok... So Why is the Type 1 setup bad? Well, It wont let you fake the up-vector constraint. Type 2 does. However the Type 1 is still usable, its just not as controllable. It may be a little more stabler though since we're not using a trick.
But if you're animating a character with IK bones, a Type 2 is what you'll want to use. Ok lets get on with the show... Lets get to Type 2...
Type 2 Setup
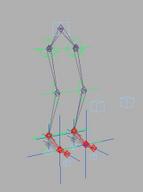 Here she is.. Type 2. She looks like Type 1 doesnt she? Well if you look closely there are some differences, but overall..They are the same. Here she is.. Type 2. She looks like Type 1 doesnt she? Well if you look closely there are some differences, but overall..They are the same.
There are 2 differences in the skeletal structure. Unlike the Type 1 setup, the foot chain is a seperate chain. It isn't part of the leg chain. The other difference is that there is an extra small bone at the hip to give controll to the rotation plane of the leg chain.
This extra joint does not have the IK controller on it. It instead has a look at controller assigned to it.
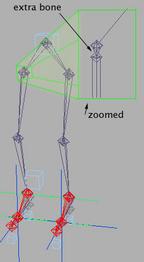 Here you can see the extra bone. I've zoomed the joint, becuase they're really close to each other. I mean really close. Here you can see the extra bone. I've zoomed the joint, becuase they're really close to each other. I mean really close.
So close that you wouldn't know. Notice the limits on the bones. I've setup limits on the X and Z axis on the hip bone because i dont want the IK to interfere with the Look at controller on the small bone above it. Note, I also disabled the Y axis completely.
I mentioned that the foot is now a seperate chain. this is to allow the leg chain to rotate properly with the look at controller. The down side to this is that the feet can rip off if you're careless. But it works well enough.
Type 2 features 2 dummies that fake the up-vector constraint.
The small bone in the hip that controlls the rotation plane of the leg chain can be keyframed manually if desired. You can just remove the look at controller and keyframe the bone.
The best way for you to understand this Type 2 setup is to disect the scene file with your new knowledge of the Type 1 setup. Again they arent that different.
Go ahead and look at the example scene:  Type 2 without Expression (3D-Studio Max 3.0 Only) Type 2 without Expression (3D-Studio Max 3.0 Only)
CAUTION!
This Up-Vector Fake does not work exactly like an upvector because its using a Look at controller. A real up-vector constraint works only on 1 plane of rotation. But a Look at controller works on 2 planes of rotation. So when animating it is important to move your fake up-vector constraint dummies UP and DOWN as well as LEFT and RIGHT because the IK bone will take into account 2 rotation planes!!!
|
 |
|
|


