|
|
 |
|
Advanced IK Setups Added on: Thu Aug 03 2000 |
| Page: 1 2 3 4 5 6 7 8 9 10 |
IK Setup Type 2
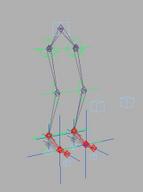 Setup Type 2 uses the same concepts as Type 1, however it solves the knee positioning problem. Both Type 1 and Type 2, use the boot concept, and contain the same controls. The difference is in the Skeletal structure. Type 2 uses 2 chains, and an extra joint to control knee positioning. You can then use a look at controller to fake an up-vector constraint Setup Type 2 uses the same concepts as Type 1, however it solves the knee positioning problem. Both Type 1 and Type 2, use the boot concept, and contain the same controls. The difference is in the Skeletal structure. Type 2 uses 2 chains, and an extra joint to control knee positioning. You can then use a look at controller to fake an up-vector constraint
PROS:
This skeleton allows you to have all the controll you'll need to animate.
Allows FK and IK animation on feet/toes
Allows for controll of the upvector plane of the leg chain. This allows the animator to orient the knee as desired. This solves the knee positioning problems that occur with Type 1.
CONS:
The skeletal chain is now 2 chains. This makes the foot detatchable if animated carelessly.
The simulated up-vector constraint may not be as stable as a real up-vector constraint, but is still very useable
The Boot
The boot (below) does 2 things. It controls movement, and works as a visual aid. The boot consists of a single chain of bones. The root of the chain does not have the "New IK" controller. However the rest of the chain does use the "New IK" controller.
The boot is a 3 bone chain. as you can see the boot is made to mimic the foot and toe bones of the IK chain or chains that will be used to actually deform the character.
At the toe pivot, there is a rotation end effector. This rotates the heal of the boot. The end effector is linked to the "heal controller" dummy object. Now you can rotate the heal controller dummy object on its local axis and it will rotate the heal of the boot.
Next we need to create a control that allows us to animate the position and rotation of the of the foot. To do this, just simply parent root of the boot chain, and the heal controller dummy to the foot positioning controller dummy.
What we have now is a working boot. The animator is to use the 2 dummy objects to control the foots rotation, positioning, and heal lifting (rotation).
One again, remember that the boot is not the skeletal structure that is used to deform the characters surface. It is only a way of controlling the skeleton that will be used to deform the character.
The boot is the key to both setup Type 1 and Type 2. It allows simplified control of the foot, and its visualy appealing as a guide. Nothing is worse than a cluttered setup with controlls everywhere. The boot can also be used to drive an expression is desired.
|
 |
|
|


