Intro Welcome to the OX (Ornatrix) crash course. Some of you may not know what OX is, basically it's a hair/fur system for max that's developed by Marsel Khadiyev. In this tutorial/overview I will show you how to get up and running in OX so you can start putting hair on those bald models! I will do my best to familiarize yourself with the interface and tools. Now I'm going to assume you know your way around max. 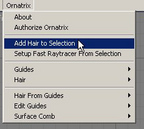 Once you have installed OX, you should see a menu at the top of the screen next to the help called "Ornatrix." This is pretty much where you start creating your hair. Also there is another way to access the tools. Go to the command panel>geometry>EPHERE Ornatrix. From there you'll see various options but the one we care about is Quick Hair. But if you go to the top Ornatrix menu, clicking on Add Hair to Selection does the same thing as Quick Hair. Ony thing different is with quick hair you have to have an object in the scene first, then you click on add hair and select your object. Once you have installed OX, you should see a menu at the top of the screen next to the help called "Ornatrix." This is pretty much where you start creating your hair. Also there is another way to access the tools. Go to the command panel>geometry>EPHERE Ornatrix. From there you'll see various options but the one we care about is Quick Hair. But if you go to the top Ornatrix menu, clicking on Add Hair to Selection does the same thing as Quick Hair. Ony thing different is with quick hair you have to have an object in the scene first, then you click on add hair and select your object.

Before we actually get started, make sure your units are set to generic for the purposes of this tutorial. Ok so to get started, make a sphere in your perspective viewport with a radius of 35. We could use any other object other than a sphere, it's just that a sphere demonstrates OX nicely. Next, go up to the top menu and choose "Add Hair to Selection." Right off the bat you'll see your sphere with all these hairs applied. Pretty much what we just did was a shortcut. If you look at your modifier stack you'll see there's OX Guides from Surface, OX Edit Guides, and OX Hair from Guides. We could have added these in all separately. Ok, if you didn't notice OX created a separate sphere called sphere02, rename it to "Hair". So select Hair and go into the modify panel you'll see that there are quite a few options and may look a bit daunting at first. Trust me, after you use it for a little bit it's easy.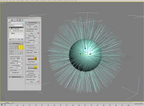 As of now, our roots are set on random area based. But we can change that by going into the root distribution rollout. For fun, change it to like Uniform distribution. Now the roots are uniformly placed from the spheres normals. Though, I suggest setting it at either Random UV based, or Random Area based because it's more like real hair would be. We really don't need to change the other settings now but we might later. Next, go to the next rollout down called OX Edit guides. Now these are probably some of the most coolest features OX has. By clicking on Edit guides you'll notice right away that a lot of the hairs are gone. This is normal, when you go into Edit Guides mode it it does this so when you edit your hairs they don't have to be all in the viewport all at once. Just increases the viewport speed.
|


