Ok so now were in Edit Guides. Below you'll see a rollout called Guide Settings. From there, click on the button that says Root Level. From here you can actually plant and remove roots which is really handy. In the Root Operations rollout click on plant and start planting some roots where some spots on the sphere look empty. Also notice how when you plant them, they get planted based on the normals just like all the other roots. So removing them is similar. Just select a root (will turn yellow) and click remove. Or you can select multiple ones and remove them as well. there, click on the button that says Root Level. From here you can actually plant and remove roots which is really handy. In the Root Operations rollout click on plant and start planting some roots where some spots on the sphere look empty. Also notice how when you plant them, they get planted based on the normals just like all the other roots. So removing them is similar. Just select a root (will turn yellow) and click remove. Or you can select multiple ones and remove them as well. Now here is where were going to actually be styling our hair. Click on the comb icon. In the brushes rollout, you'll see eight different brushes available. If you click on the comb brush and start clicking and dragging your mouse across the hair, it will comb it. Try and get your hair to look like the picture below. 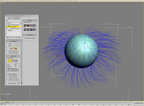
As you can see, it's very easy and intuitive to style hair in OX. Now get out of edit guides mode and go to OX hair from guides. Now all the dense hair is back on our geometry. Cool thing is OX comes with lots of modifiers you can add on top to add even more control and realism. To start off, go to the modifier list and scroll down. You'll see a whole category dedicated to OX, select OX Strand Clustering. 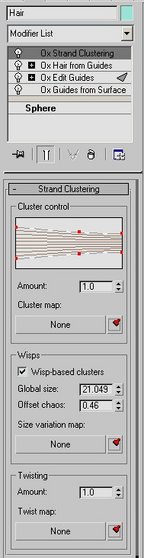
The picture on the left shows the interface of the hair clustering options. When you adjust anything, it updates in realtime. Try adjusting the cluster rubber bands and see what happens. Pretty straight forward, if you adjust the first set of bands it changes the inner strands, middle bands the middle section of the hair and so on. So now since we have this applied, lets add on another one shall we. Now add a OX Strand Frizz. From the options just adjust the amount to 0.7. Just a reminder, with any of these modifiers you can add material maps to control them. Say for instance the frizz map, you could add a noise to control the amount of frizz based on colors and noise type. 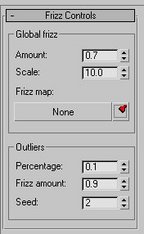
|


