By now, your hair should look similar to the picture on the right.
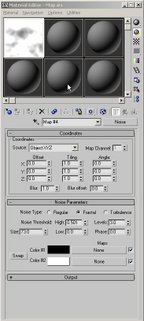
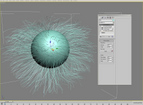 Now to finish the styling, we'll top it off by adding one more modifier, OX Hair Length. Now this one is definitely really fun to play with. Add it on the stack and then launch the material editor. Click on Get material and select noise. Put noise type to fractal, size to 73, low value to 0, and the high value to 0.5. Now click and drag it over to the length map slot and instance it. You can now clearly see that the length map has affected the hair. Now to finish the styling, we'll top it off by adding one more modifier, OX Hair Length. Now this one is definitely really fun to play with. Add it on the stack and then launch the material editor. Click on Get material and select noise. Put noise type to fractal, size to 73, low value to 0, and the high value to 0.5. Now click and drag it over to the length map slot and instance it. You can now clearly see that the length map has affected the hair.
Initial scene setup Ok, so now that were done with the actual styling we'll 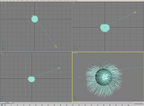 concentrate on the rest of the scene like the lights, and hair shaders. Next, create a spotlight and angle it up a bit to match the picture below. Rename it to "Hair light". Alrighty, now since that's done we need to adjust some of the lights properties. First, turn on shadows and set the shadow type to OX Hair Shadow. Now in the OX shadow properties turn on object-object shadows, and click on add and add the hair so it receives shadows. Finally, set the light's RGB color to 219,246,251. If we now go ahead and render, we get nothing... why? Well, we haven't yet enabled OX's renderer/raytracer yet. This is found in the environment panel. If you hit add, you'll see two different types, fast and accurate. We'll use accurate just so we can get the best quality. Main difference between the two is accurate supports full rayracing capabilities such as reflections/refractions and among some other things. So in the Hair raytrace accurate settings, add the hair in the hair objects list. Now hit render, you should see something now. And just letting you know the speed of OX this rendered in 53sec on my P4 2.5Ghz at 640x480. Depending on the angle, you'll notice that a lot of the hairs are different thickness. To fix this, we need to add a thickness map. Go into the material editor and hit get material and then gradient ramp. Set it to VW, and the left flag make white and the right flag black. This means the hairs thickness is based upon the grayscale going from white to black. Now instance this map into the thickness map which is in the raytrace accurate settings. Make the Global radius 0.2 and adjust the points so it matches the picture. concentrate on the rest of the scene like the lights, and hair shaders. Next, create a spotlight and angle it up a bit to match the picture below. Rename it to "Hair light". Alrighty, now since that's done we need to adjust some of the lights properties. First, turn on shadows and set the shadow type to OX Hair Shadow. Now in the OX shadow properties turn on object-object shadows, and click on add and add the hair so it receives shadows. Finally, set the light's RGB color to 219,246,251. If we now go ahead and render, we get nothing... why? Well, we haven't yet enabled OX's renderer/raytracer yet. This is found in the environment panel. If you hit add, you'll see two different types, fast and accurate. We'll use accurate just so we can get the best quality. Main difference between the two is accurate supports full rayracing capabilities such as reflections/refractions and among some other things. So in the Hair raytrace accurate settings, add the hair in the hair objects list. Now hit render, you should see something now. And just letting you know the speed of OX this rendered in 53sec on my P4 2.5Ghz at 640x480. Depending on the angle, you'll notice that a lot of the hairs are different thickness. To fix this, we need to add a thickness map. Go into the material editor and hit get material and then gradient ramp. Set it to VW, and the left flag make white and the right flag black. This means the hairs thickness is based upon the grayscale going from white to black. Now instance this map into the thickness map which is in the raytrace accurate settings. Make the Global radius 0.2 and adjust the points so it matches the picture. (all reference images are on next page)
|


