|
|
 |
|
Introducution to Polygonal Modeling Added on: Sun Aug 20 2000 |
| Page: 1 2 3 4 5 6 7 8 9 10 11 12 13 14 15 |
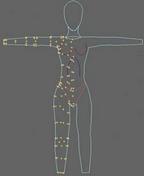
Use the images below as reference, I believe they explain where to place detail better than words could.

Once you have placed all of the verts for the body (and made sure you haven. t put any vertices in that aren't needed)it will be time to begin building the faces. Go to the editable mesh face level and click . Build face. .
In the front viewpoint begin clicking on the vertices and clicking on the kindred vertice
and then the third (make sure you connect them anti-clockwise or else the normal will be in the wrong direction).
Continue to connect them all up face by face until you have a solid flat mesh representing a body in the front viewpoint. If you look in the other viewpoints the mesh will be totally flat, your next job is to grab the vertices and pull them forward one by one (or in groups) so that it represents the front half of the body (you model the back half next and sew them together).

Pulling vertices
From here you have to move the vertices forward to make the flat mesh turn into a 3d mesh. Leave all of the verts on outer edge (the ones where you created a second vert next to them) alone since they have to stay where they are. The others you pull forward using the side viewpoint and perspective viewpoint for reference. Pull the the ones on the side forward a bit but pull the very middle ones forward the most.
You will begin to see depth in your model, continue to refine the points position until they begin to resemble human body parts.
Leave the hole for the breasts since you will be placing them in later on. Once you have created the front of the mesh and it represents what looks like the front half of a human female body, it is time to move onto modeling the back half of the model. Before moving onto modeling the back half of the model, read through 'refining techniques' next.
|
 |
|
|


