Some people like to criticise the Maya software renderer, however we've found it to be a capable production tool, perfectly fitting for video res (640-720 pixels) cinematics. With the proper shaders and some compositing, it can deliver great results, and we usually managed to keep render times under 2-5 minutes for one frame on our P3 render nodes.
However, Maya tends to slow down with closeup shots of surfaces using complex shaders and large textures, especially bump mapping. We also suggest to manually set the antialiasing contrast threshold to 0.05 RGB. Lighting in all-CG scenes has a few typically problematic areas. First of all, shadows are usually depth maps which consume memory if the light has to cover large areas; and the map bias can be problematic to adjust if the light is too far from the object. Also, most objects will require several fill lights to brighten up shadowed areas, not to mention rim lights. The ground plane would recieve illumination from all of these lights, which would quickly wash out the colors. Our solution is to break up the scene into layers, and assign lights to layers individually. This way we can have different lights for the ground plane, characters, static and movind objects. Shadow attributes can be fine tuned individually, and we don't have to use light linking. 
Render layer editor
Robix has developed a simple and easy to use render layer manager script to help manage the process. Objects were packed into groups in Maya. "Layer" sets were then created from these groups, with a set usually containing the CAM group, and one or more Light group and Object group. It was possible to assign a Light group to more than one layer too, so shared lights did not have to be duplicated.
During the lighting and testrenders, the group's visibility attributes were adjusted to display only the selected layers; and for the rendering, the script exported the groups in the layer to a scene file into the project structure. The only negative effect was that the renders had to be assembled in a compositing package to check the complete image.
We used many rim lights to accentuate object edges, or to lift characters from the backgrounds. We tried to follow the real lighting conditions in a scene, but never hesitated to cheat when it served the final image. The shaders usually helped to catch the rim lights and thus we never had to use more than 1-2 spots for this. 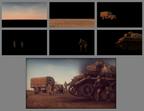
Some of the layers used in a shot and the final composite
|


