|
|
 |
|
finalRender 101: Basic HDRI and Ray Tracing Added on: Sun Apr 28 2002 |
| Page: 1 2 3 |
Although acceptable global illumination results may be obtained by using the environment color as your basis for lighting a scene, using a solid color, or even a gradient map will still produce a only a uniform distribution of light.
The more I use HDRI the more I prefer it to other methods of GI. HDRI stands for High Dynamic Range Imaging. It uses 360 degree photos taken from a reflective sphere, a series of pictures with different exposure settings that capture the ratio between dark and bright regions as represented in the real world.
Mapped as a spherical environment, HDRI illuminates the scene with different levels and colors of light based on pixel information.
The result is more realistic than other methods of generating global illumination, and the amount of light can be altered through the exposure settings.
Final Render ships with one .hdr file, outside.hdr. You can download other HDRI files from Paul E. Debevec's site at http://www.debevec.org/~debevec/Research/HDR.
Create a ground plane and two spheres. For the ground I used the grydirt1.jpg included with Max. For the sphere materials I used a specular level of 74 with the glossiness level set at 60.
As with the previous excercise we need an omni light. It's inclusion in the scene disables Max's default lighting. We want it to show the hightlights on the spheres but not wash out the scene, so turn off diffuse in the modifier panel. Leave specular on.
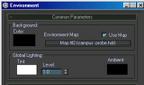
Go to the Environment panel and select bitmap HDR from the map browser. Go to Material Editor, then to the Map Browser. Choose Browse from Scene and bring an instance of the map to the Material Editor.
 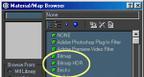
Under the bitmap parameters assign an hdr file. In this case I used the campus_probe.hdr from Paul E. Debevec's site.
The ouside.hdr file should work just as well, though you may have to use different exposure settings.
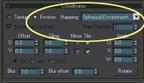
Under the Material Editor Coordinates rollout choose Sperical Environment.
|
 |
|
|


