|
|
 |
|
Making of Audi TT Added on: Sun Oct 29 2000 |
| Page: 1 2 3 4 5 6 7 8 9 10 |
After you have done, that make a quad patch (not add! make a new one) in the top view remember earlier pointers.Stretch it out to form a sort of oblong shape.
I shall refer to this piece as "abovearch" this piece stays seperate and will lead into the bonnet of the car.
Select all parts on screen and mirror along the X axis, choose Instance (Instance will update changes made to the original) and leave about some space between the 2.
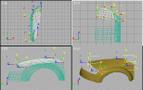
When you have neatened "abovearch" select its edge facing away from you, the edge pointing towards the centre of the car... we are making the bonnet. Add a quad to that one...woah! It goes shooting all over the place huh?
Tame it! Bring it under control...see illustration picture (Sorry about the pic quality by the way, trying to keep them as small as possible and yet useful).
See the quad you just added and shaped, detached it frome "abovearch" (edit patch>subobject>patch>click the piece, a red line shows up all around it and you click detach). Just leave it in that position dont move it.

Getting excited now eh? Starting to see your TT ttttttaaaaaaaking shape? Take care to do a good front and you can use it later as the back of the car simply rotate a copy of the finished front and modify it to fit. Not a huge difference!, trust me on that.
I have put the original raytrace colour back on and animated the piece so far to show you what you should have.
Save as seperate file audittarch03.max
Things are going to jump ahead right now.
What has happened in the pic below is simple. I selected the forward edge of the middle bonnet piece, added a quad patch and folded it inside to make the grill area, neaten this in all viewports before you add another quad to that new one edge, we are patching in a C shape...follow the arrows.

For the bottom patch the left viewport in the pic above shows where you patch from across from under the headlight area by adding a quad.
|
 |
|
|


