|
|
 |
|
Realistic head with NURMS Added on: Sun Sep 03 2000 |
| Page: 1 2 3 4 |
NOTE: This tutorial has been created for the user with a basic knowledge of 3D Studio MAX.
Overview
In this tutorial, I will show you how to go about modeling a realistic head using NURMS (Non-Uniform Rational Mesh Smooth). Think of NURMS as a �cage� overtop of a high poly mesh, which is easily controllable by that cage. It�s almost like modeling with clay.
So why model with NURMS?
Well, here�s the answer. If you have ever tried to build a seamless character before, say with NURBS (Non-Uniform Rational B-Spline), you know that it is very difficult to build and attach a bone system that deforms the mesh properly.
Why not model with patch grids then you ask?
True, building with patch grids is very easy and fast, plus almost feels like modeling with clay. But patch grids use bezier handles and is very difficult to maintain surface tangency when it comes to facial animation or deforming the mesh with a bone system. Modeling with NURMS takes away all of these headaches, for the most part.
In the most basic form, you build your low poly mesh however you want, and apply a �Mesh Smooth� modifier at the top of the stack. All you have to do is apply the low poly vertices to the bone system, and the high poly mesh deforms properly!
Now let�s get into more detail.
Finding / Setting up the head reference
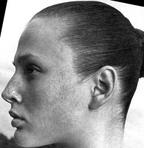
To start, you will need reference to build your head. I flipped through a bunch of Cosmopolitan magazines and picked a good front and side view. Now, the BETTER way to do it is actually taking a picture of someone, but, at the time, I needed to start right away and didn�t have a digital camera at my disposal. But the pictures from Cosmopolitan work fine.
If you have to resort to magazines, the two pictures more than likely they won�t be the same size. Take those scanned in photos into Adobe Photoshop and line them up as best as possible. Make sure that the top of the image is cut off at the top of the head, and the bottom of the image, at the chin.
Once you have them lined up, save both images out separately as something like, FrontView.jpg and SideView.jpg.
|
 |
|
|


