|
|
 |
|
Low Poly Modeling for Real Time Added on: Mon Oct 16 2000 |
| Page: 1 2 3 4 5 6 7 8 |
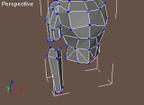
Since we do not want a square arm when we extrude out the arm, we'll want to add more vertices and curvature to the arm socket, we do this by going to the edge level and choosing devide. Clicking on the direct middle of an edge to devide it, and then do the next edge and the next. What happens is where the edge is devided is a vertice is placed there, deviding that edge into two. If you look below you can see the two red vertices and in the middle a blue one is created by deviding the edge.

Whilst in edge mode select the edges, hold extrude and begin to clone/extrude the edges out to form the top of the arm, rotate them and continue to pull them out, try to keep it clean as you begin to form the actual arm.
After building the top of the arm we are going to build the bottom of the arm from faces rather than just extruding the arm out.
So go back to vertice mode, and place one vertice at the left of the wrist, one at the right of the wrist and one in the middle, do it again for just below the elbow, and then again just above the elbow. Once you have done that, grab the vertices and pull them out in the left viewpoint and form the actual shape of the arm.
Go to edge mode and add extra segments to the arm so there's five vertices in the arm like with the upper arm. So go to cut which is located near the divide button. Click on the edge in-between two vertices on the wrist, and then go up one segment and then one segment higher. Do it for the other side of the forearm,too.
You may have noticed that cut cuts the segments in half like divide but does it neater and leaves the edge visible instead of making it invisible. Grab the vertices that were created and pull them out slightly to give the forearm roundness.
Now what is left is to build the faces in-between the two faces, go to faces and build the faces counter clockwise to sitch the segments together.
 
|
 |
|
|


