|
|
 |
|
Compositing: Pyrotechnics Added on: Sun Nov 26 2000 |
| Page: 1 2 3 4 5 |
Now here�s the part where you have to create several spacewarps such as gravity, wind ect. To simulate an explosion. I will list only a few tips here for making it but the rest is quite self explanatory all that is really required is a lot of tweaking until it looks perfect.
 First of all try creating a spherical wind spacewarp and assigning it to the parray. Next up give it a value of 1.5 and a decay value of 0.0222 (assuming you are using inches as the unit system) Note: If you are using 3dsmax R3 there is a very helpful feature called "range indication" which helps you see the radius of which the spacewarp's range effects. This will help you see and visualize all of your spacewarps more effectively. First of all try creating a spherical wind spacewarp and assigning it to the parray. Next up give it a value of 1.5 and a decay value of 0.0222 (assuming you are using inches as the unit system) Note: If you are using 3dsmax R3 there is a very helpful feature called "range indication" which helps you see the radius of which the spacewarp's range effects. This will help you see and visualize all of your spacewarps more effectively.
Now place a few more around and some gravity, and a deflector with a value between .1 and .5 for the bounce. Now keep playing the animation and watching how the spacewarps effect the mesh, continue to play with the settings and the positions of the spacewarps until the scene looks like it is simulating a real explosion of a house.
 Now if you rendered the scene so far everything should look great, but you will notice one thing, that when the house blows up, the plate is unaffected by it. Therefore there is still a house behind your 3d house. This is a problem. Here is how we fix it: Now if you rendered the scene so far everything should look great, but you will notice one thing, that when the house blows up, the plate is unaffected by it. Therefore there is still a house behind your 3d house. This is a problem. Here is how we fix it:
Load up photoshop, and open the plate. Now using all of the tools you have at your disposal, go about painting out the house. Paint what would be behind the house if the house wasn�t there, this should be rather easy for something like a 40x40 selection such as this house. Though of course with much larger plates and such it will require hours and hours of work and a lot of skill as a matte painter. And in a lot of circumstances you will be creating an aftermath plate not just brushing out a simple house.
An aftermath plate means you will be repainting a lot of the photo demonstrating the aftermath of the effect you are trying to pull, for example a building being blown up.. well you won�t paint away the building but instead painting a photorealistic version of the building after it�s been blown to pieces and crumbled to the ground. Luckily we�re not doing that with this effect!
Once you have airbrushed out the house, save this plate as "plate-aftermath.jpg" or whatever name and format you choose, making sure you can distinguish this as the plate that doesn�t contain the house in it.
 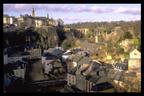
Before | After
|
 |
|
|


