|
|
 |
|
"I, Robot" Added on: Fri Nov 17 2000 |
| Page: 1 2 3 4 5 6 7 8 |
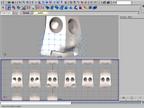
And there we have it, the basic neutral head model.

Now it's time to think about the facial expressions.
At the end I made 15 different expressions because I decided that I want to use the model for other purposes as well.
Having 15 different expressions gives you a nice degree of control over the face. Making blendshapes in Maya is very easy, there is only one problem, you cannot duplicate and mirror blendshape geometry (as far as I know anyway).
This means that a head that has been tweaked to raise it's left eyebrow cannot be duplicated and mirrored to create the raised right eyebrow. (by the way, if anyone knows a way around this please let me know :).
To make this process a little easier I deformed the heads with a lattice, this gives you less points to tweak and speeds up the rather tedious process of mirroring the expressions. Every time an expression was finished I mirrored the (tweaked) lattice and used that as a template for it's counterpart. By using pointsnap I could then snap the points of the new lattice into the right shape (are you still with me?)
Make sure that the each face has a proper name like "smile left" and "smile right" these names will appear later in the channelbox, so this will make it easier to select them from the list.
Put all the different heads in a separate layer so you can make them invisible when you don't need them. You could even delete them but I would not do that until you are absolutely satisfied with the result.
Now select all the heads one by one and select the "base" head last (the one with no expression) then go to "Deform" and select "Create Blend Shapes". Voila, you now have an almost endless amount of different expressions at your disposal.
|
 |
|
|


