|
|
 |
|
"Enter the Dragon" Added on: Wed Sep 27 2000 |
| Page: 1 2 3 4 |
Shaders (cont.)
Hair is simply a blend of fractals and grid texture to get those white stripes into it.
I saved shots "before" & "after" I added the new shaders to the guy. See pictures below.
Ground is a simple stone bitmap, with same bitmap "greyed" as bump. The bumps bitmap has no filter effect, for a more rougher look. Stones color and bump nodes are mapped with Maya's "stone" shader.
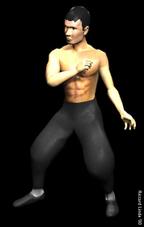 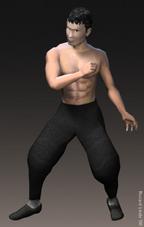
Before and after
Lighting & Finishing Up
This is where I spent most of the time with the last couple of months. Understanding what global illumination is and trying to simulate this, is a great way to learn more about lightning. I have also read the book "Digital Lightning" and it brought me many nice ideas.
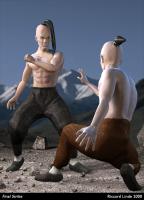
I used the "Three-Point Lightning" setup as a reference with bounce lights. Key lights - 3 spotlights with depth mapped shadows (2 of them have light orange color). Fill light - spotlight near the camera to the right. Backlight - 3 white spotlights, covering a large area at the characters backs. Bounce light - point light with Decay Rate. Same color as the ground (Brownish grey).
I turned down the saturation on the background. Placed my key lights in the same direction as they hit the mountain. Tried to simulate a scene during an afternoon. None of the lights in the scene are blue, the blue outlines on the guys are controlled by the
skin shaders specular.
Until this last part, I've used lowpoly objects. They are easy to remake and control. Now I had to make them smoother. So I added some different types of smoothing on different parts of the bodies. I also changed hard/soft edges, to make the light bounce correctly onto the characters.
I made a lot of test renderings to get the light to sculpt the objects, thanks to Maya's IPR, this went quite smoothly.
The Image comes directly from the renderer, there has NOT been added anything except my name and title at the bottom in Photoshop.
The final image is shown below as a wireframe and full rendered.
|
 |
|
|


