|
|
 |
|
"The Labyrinth" Added on: Sat Aug 12 2000 |
| Page: 1 2 3 4 5 |
Texturing
At first I hoped to use displacement mapping to add realism to the stone arch surfaces, and performed a quick test (Figure 3).
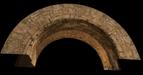
Figure.3
The test looks fairly nice, but to generate this kind of result with the number of arches necessary for my composition would have taxed my computer's RAM and my patience. So I decided to stick with bump mapping only for my 3D rendering, and proceeded to UV map the instanced arches with a single texture used as both color map and bump map.
The original texture (Figure 4) is from an ancient wall on the Athenian Acropolis. I'm a strong believer in using photographic texture sources. Not only is hunting down cool textures a lot of fun, but the results are far better and faster than when painting maps from scratch or trying to "jazz up" boring library textures.
I made only two modifications to my original stone texture through the course of the project. First I did a levels adjustment to bring out weathering detail, and then I painted in dirt and strips of rectangular insets to add much needed rhythmic interest. It's always good to have multiple scales or levels of detail going on in an image to keep the eye and mind circulating around. By setting the material of my arch model to a constant, full self-illumination, I was able to output the texture pass of my final render (Figure 5).
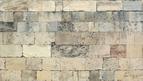 
Figure.4 and Figure.5
Lighting
To start lighting, I mapped the background image I would be using onto a plane and stuck it behind my geometry. This would allow me to use the image as a constant reference for sun angle and light colors as I did my test renders. My sunlight is represented by two different shadowed area spots, placed well away from the arches so that their rays are roughly parallel in the center of my scene (mental ray doesn't allow for directional area lights).
One area light is meant to be the sun's primary illumination (Figure 6), and the second larger light is sunlight which has been diffused through light cloudcover (Figure 7). Why not use a raytraced directional light for sunlight like everyone else? Because real sun shadows blur an inch for every 10 feet of casting distance (by my informal observation), and over architectural distances this blurring is significant. Also, it looks nice.
|
 |
|
|


