|
|
 |
|
Landscape with Heightfields Added on: Fri Aug 25 2000 |
| Page: 1 |
Heightfield
Generates a single surface larger than the input curves, but is fit to go throughout
the curves.
Heightmap
A Picture file where light colors equal high areas and dark colors and shades equal the low areas (Pure Black is seas level).

Overview
This tutorial will teach you how to make a Mountaineous terrain from heightmaps using Rhinoceros 3D.
This is quite an easy task. While you may not get the realistic effect as you would from one of the plugins or standalone applications, (such as GeoFrac 2000, www.geofrac2000.com) but it is still worth knowing and can come in very use when you least expect it, or when you need a quick fix or final touch int he distance of a mountainous landscape scene.

Fire up your 2D editor and lets start drawing a heightmap. To draw a heightmap you have to know the meaning to it so please look up at the definition if you havent done so
already.
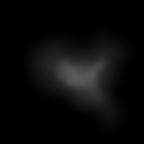
Paint a picture similer to the one below using a 2d editor such as Adobe Photoshop. This is what the terrain is going to come from.
The Dark spots are the lower spots.... black will be sea level. White is the highest spots... You want to have nice blending between them as well, or your terrain will be jagged.
Now once you have painted the height map... its time to fire up Rhino 3D and go to Surface/heightfield from bitmap. Or use command "heightfield" to access the tool.
Find your bitmap or heightfield that youve just made... now you need to drag the plane that it accesses through this command.
You will then have to play witht he numbers and settings in the msgbox that comes up to get the right effect for you.
|
 |
|
|


