|
|
 |
|
Modeling Vegetation Added on: Mon Jul 03 2000 |
| Page: 1 2 3 4 5 6 |
In Figure.2 you will see the 4 profile splines completed.
Once we have the splines drawn we will have to loft then to make a renderable surface.
To loft you will need to type Loft into the command line and press enter.
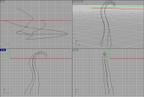
Figure.2
Profile Splines
Now you will have to select your splines in a counter, or clockwise fassion.
It doesnt matter which way as long as they are in order. Once your splines are selected you must press enter and then you will see a loft properties box popup.
Use the settings as seen in Figure.3. Check the shaded preview box and press preview to view a quick render of your current loft object.
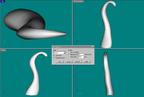
Figure.3
Loft Settings
The terms and buttons of the Loft dialog box
Closed Loft: closes the surface (In this case we do not want to use this.)
Shaded Preview: When quick shade is activated, it shows the current loft in progress in a shaded view.
Do not simplify: Uses the current set of points on a spline to determine where isoparms will be located.
Rebuild with **: Rebuilds a surface using ** number of isoparms (** is a number you indicate).
Style: Determines how your surface will be generated. Normal builds it with normal tightness and so on, while straight sections build a surface with straight sections at each isoparm. The splines are set in different colors for ease of understanding.
The Leaves
Now that you have the trunk/stem of the Weeping Ame we will work on the leaves.
Figure.4 shows the splines in different colors to ease understanding.

Figure.4
Coloured Splines
|
 |
|
|


