|
|
 |
|
CEL Shader: Chapter 1 Added on: Sun Nov 26 2000 |
| Page: 1 2 3 |
Although this tutorial is quite basic, the end effect can be useful and in some cases save you a lot of money.
This tutorial goes through the steps on how to create a cel shader for max. All it really is is a simple material with falloff and some other settings to create a basic ink effect.
 
To start off, create some basic geometry, a ground plane and either a teapot, cylinder or a viewpoint cow, set it up so the object is sitting on top of the ground plane, and the ground plane is quite large in radius so the shadow doesn't exceed the radius of the ground.
Next create a light above the scene to cast a shadow on the ground, set it to cast shadows of course.
Followed by creating a camera to view out of (it's important to create a camera for falloff purposes later on).
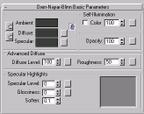
Load up the material editor and create a new material, call it CEL Material #1, to start off make the diffuse, specular and ambient colours 255 grey (R: 60 G: 60 B:60) set the self illumination colour to be 100. Set the material to be 2 Sided. Drop the specular level and glossiness to 0 and set the shader type to be oren nayer blinn.
This basically makes a flat material, of course we need to set it to have ink outlines as well, so now go to the diffuse panel and choose falloff as the texture type.
Once you've selected falloff select colour #1 (the black colour) and change it to 255 grey just like the diffuse colour. Click on colour #2 (the white one) and change it to 0 grey.
|
 |
|
|


