|
|
 |
|
Creating a Toon Shader Added on: Sun Oct 29 2000 |
| Page: 1 2 3 4 |
You too can create those beautiful cartoon images and animations without buying expensive commercial plugins.
This tutorial shows you how to do it using only standard Max materials and maps (R3.x only).
Beginning
There are two things that make a toonshader complete: The thick, usually black outline around an object and the flat-shaded surface usually with only three "bands", one band for the ambient part of the surface, one for the diffuse part and sometimes also a specular highlight.
One way to achieve this is to use a third party plugin such as Illustrate! which is commercially available from David Gould or ScripToons which is a maxscript by Borislav Petrov
and is available from Virtual Republic Boboland.
However, my method yields a good overall result, it's faster than any other method or plugin I've tested and there's no need for additional software or scripts.
The Outline
The above mentioned plugins and scripts draws a constant outline around every object. We can't do this with standard materials and maps. The biggest drawback with using my method instead of a third party plugin is that the outline is created by "cheating" and it doesn't look good on all surfaces.
The standard "Falloff" map calculates the angle from the camera to a point on the surface and interpolates between two colors or maps. We can use this map to put a black color on those parts of the surface pointing almost 90 degrees away from the camera, which is usually at the edges of an object with slightly rounded edges.
 Put a "Falloff" map in the Diffuse slot. By default the map creates a smooth blend between white on the edges to black straight on, just swap the colors and we will get the correct color on the edges. This is how it looks so far: Put a "Falloff" map in the Diffuse slot. By default the map creates a smooth blend between white on the edges to black straight on, just swap the colors and we will get the correct color on the edges. This is how it looks so far:
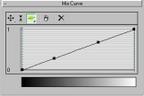
Right now, we have pure black at the angle 90 degrees and pure white at 0 degrees. This doesn't create the black outline we want, we would need say pure black between 90 and 80 degrees and the rest white. So we will have to fiddle with the "mix curve".
Scroll down in the Falloff rollout, you should see something like this:
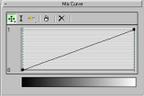
This curve controls the mix between the front and side colors (or maps). With this default setting, the first color is smoothly interpolated over the surface. Add two control-points like this:
|
 |
|
|


