|
|
 |
|
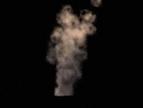
"Smokin 2" - Intermediate 3dsmax Particles Added on: Wed Oct 11 2000 |
| Page: 1 2 3 4 |
Go up one level and choose the white slot now and choose noise again, and punch in these values:
noise type: fractal
size: 27.8
high: .641
low: .385
levels: 1.3
colours: 1: 100% black
Create a particle age in the colours slot.
Use the default settings but drag colour #1 onto #colour 3 and choose 'swap'.
Now go back out to the mask level again, go to gradient level, go to frame 150 and hit the animate button. Change the phase value to 5.0. Go to noise level now, give it a value of 4.2 Go to the noise level below that and give it a value of .532 go to colour #1's noise layer and give it a phase value of 3.96 and leave colour #2.
Go to diffuse slot now and give it a particle age. Give it the colours you feel like giving it, essentially this is the 3 colour values it will cycle through, you can give it sub maps and more gradients within it if you want, essentially though it just needs a basic colour and variations of it.
Essentially that's it for materials, from there you could try to play with self illumination maps based on world coordinates or other things which I might document on later, but now it's time to move onto lighting!
 Lighting Lighting
When creating smoke and other particle elements, a lot of people think that smoke plays a small part in particle effects, but it actually can control a lot in the actual scene. In some cases it can be the thing that actually makes things look like fire rather than really dodgy smoke, or like water ect. It can make and break a scene given the right circumstances.
Create an omni light above in the sky, make it sky blue. Give it a multiplier of 1.6 and deselect specular. Enable shadows, now creat a new omni, one right in front of the particle system with a yellow tinted colour, Give it a multiplier of 1.
 Disable specular, and enable cast shadows. And create an omnio light behind the particle system with a multiplier of 3, and a dirt brown colour. Disable specular, and enable cast shadows. And create an omnio light behind the particle system with a multiplier of 3, and a dirt brown colour.
Create one last directly below it with a washed out grey with slight blue tint.
Make sure the bottom two lights do not have cast shadows on so that we the light can't be blocked.
  Create a plane for the ground and give it matte so that it blocks off the very bottom round part of the particles, it just looks better mmmmkay? Create a plane for the ground and give it matte so that it blocks off the very bottom round part of the particles, it just looks better mmmmkay?
Okay, I think that's it for now, I'll write a chapter 3 on smoke, vapour effects soon using super spray, paaray and pcloud and all of their advanced features. Plus cover work arounds for the limitations of spray and a few othe particle systems.
|
 |
|
|


