|
|
 |
|
Advanced IK Setups Added on: Thu Aug 03 2000 |
| Page: 1 2 3 4 5 6 7 8 9 10 |
 This is what you should have if you've created everything correctly. (See image Step 2) This is what you should have if you've created everything correctly. (See image Step 2)
Please note that this tutorial expects you to understand the basics of bone creation in max. I will not go through the entire steps to create the skeleton to save time, and i expect you to beable to do that on your own already. If you can not do that, please refer to your 3D-Studio Max Manuals and go through the Bones section.
Whats Next?
 Next we need to create the end effector at the toe. Next we need to create the end effector at the toe.
If you look back at the Step 2 image you can see that the toe bone has the last possible pivot. That last diamond at the end is where we need to createand end effector. We will also need to place one at the heal. (See image Step 3)
And.. we will also need one at the pivot between the heal and toe. This now allows us to keep the foot flat on the ground. These 3 end effectors will be driven by the Boot.
Gettin' yo Boot on!
Before we put the boot on our foot, we must create it!
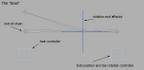 Lets create the boot... Look at the image to the side. Lets create the boot... Look at the image to the side.
In the Boot, the root of the chain does not have the ik controller asigned to it. So to create the boot, you must turn off the "assign to root" option under the bones creation menu. You should be able to create the boot easy by following the diagram, just know that the root should not have the IK controller assigned to it.
Also, Note that first bone goes from the root to the end of the toe, and then back to the ball of the foot, and finally up to the heal. The Joints of the bones should be exactly matched up with the joints of our skeletal chain that we made earlier.
|
 |
|
|


