|
|
 |
|
Multiple Texture Mappings Added on: Sat Jul 01 2000 |
| Page: 1 2 |
Two of the most annoying problems associated with 3D object texture mapping are
"stretching" and visible seams.
These problems can destroy an objects believability, making them look artificial. Fortunately this has been addressed in 3D Studio Max and can now be minimized using the blend material and multiple object texture mappings.

Above is an example of two spheres, one using normal spherical mapping and the other
using multiple mappings. The stretching problem is clearly visible on the polar region
of the sphere on the left, while the sphere on the right although oriented in exactly the
same position shows no stretching.
In order to apply multiple maps to a single object, open the Material Editor in 3D Studio Max and create a "blend" material (click the "standard" button and choose "blend" from the list). You should see something similar to this:
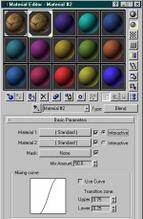
The blend material allows you to blend two maps together in any ratio desired. Click the button next to "Material 1" in the blend material roll-out and assign a diffuse map to it. In this case I am using a bitmap but you can use any of the material types offered by 3D Studio Max.
|
 |
|
|


