|
|
 |
|
"One Buggy Day" Added on: Wed Nov 21 2001 |
| Page: 1 2 3 4 5 |
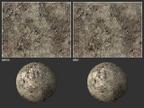
A lot of fine detail was added with bump maps. Although sometimes I use the diffuse map as the bump map, the best results are achieved when creating an individual image for this purpose. Notice, for example, the detail added in the bump map for the head, in comparison with the corresponding diffuse map; this fine detail contributes a lot to the overall realism of the model.
I also painted a lot of noise in bump maps to simulate dirt, imperfections or random surface chaos, rarely leaving any flat color areas. Recreating nature's small details can determine the overall credibility of a render.
I usually create additional maps for the Specular Level and Glossiness, but after test-rendering the scene with only the Diffuse and Bump maps applied, I decided to skip them. I just tweaked the corresponding global values.
All materials are made of blinn shaders. The body, head and legs were assigned a high specular level and a medium glossiness to create strong highlights, simulating a kind of damp/viscous look. The diffuse maps were filtered through a falloff map do darken the rim areas, assuring a higher contrast with the white fur.
For the shells I also used a falloff map but to create a slightly brighter profile.
The stones received spherical mapping coordinates (before the Noise modifier was applied). The maps that wrap the stones needed a special preparation, in order to blend seamlessly.
In photoshop I opened the maps assigned to the stones and applied a Polar Coordinates filter (rectangular to polar). Then I smoothed the sharp transitions and applied the Polar Coordinates filter again (this time with polar to rectangular checked). When applied, the texture adapts seamlessly to the stones.
Lighting
To achieve photo-realism I considered using Global Illumination. Although this is a relatively simple process that produces highly realistic light environments, it also consumes huge amounts of rendering time. Since this particular scene didn't present any serious issues of color bleeding, I opted to simulate GI using sets of different lights that could fake the color bouncing, obtaining a very fast render with a satisfactory realistic look.
The skylight was obtained by placing 8 spotlights around the bug, with a bluish color and a low intensity value. Affect Specular was turned off to prevent the creation of multiple specular highlights all over the scene.
A lot of realism is added when cast shadows is turned on, choosing Shadow Map with a small size and a high value for the sample range, creating very soft shadows and subtly darkening the corners of the objects. The spotlights must also have a broad hotspot (so they can cover most of the scene) and a falloff that guarantees a subtle gradation of light in the farthest areas.
|
 |
|
|


