|
|
 |
|
"My Precious" Added on: Sat Sep 22 2001 |
| Page: 1 2 3 |
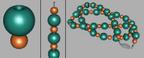
However, the result is perfectly straight, with each bead directly inline with the last. To give the necklace a more curled up, twisted appearance I collapsed all of the pearls into a single mesh and then used the "Path Deform" modifier which lets you deform an object so that it follows the curve of a spline.
The downside of this method is that it can result in strange warping of the mesh, look carefully at my picture and you will see that some of the pearls are quite squashed. I am unaware of any good way of solving this problem, though in this case it didn�t matter too much. The clasp part of the necklace was simply built from boxes and an elongated chamfer-cylinder.
The diamond and emerald broach started as a simple spline curve which was extruded to
form the metal base in which the stones were set. To make the gem stones I started with a
cylinder with very few sides and no height segments. I converted this to an editable mesh
and modified it by chamfering and welding vertices in order to achieve the triangular facets of a "rose cut" stone.

The materials used in the scene were fairly simple. I gave the bracelet a tiny bit of "perlin marble" as the diffuse colour and some barely noticeable procedural noise as bump. It�s always better to have some variation to colour, bump and specular, even if it is subtle to the point of not being noticeable.
The alternative is to leave a material completely uniform which looks dull and never really happens in reality anyway.
I gave all of the objects in the scene (except the ground plane) raytraced reflections. I gave the gem stones raytraced refractions and was careful to give them the correct index of refraction for diamond and emerald.
When it came to rendering I didn�t simply render the scene off once and leave it at that, but rather rendered it many times from exactly the same perspective, then combined the results in Photoshop. Of course this would be completely pointless if each rendering was the same as the last.
What I was doing was rendering each iteration with different qualities, different lighting, and importantly a number of iterations using the public alpha of Brazil
(www.splutterfish.com), a plugin renderer that can simulate radiosity, caustics and other
complex effects.
This way I was able to tweak and perfect the lighting by varying the opacity of the images in Photoshop, I could perfect the specular highlights because I had rendered iterations where the lights effected only specular, I could darken the pearls because I had the ALPHA channel image of an iteration in which everything but the pearls was hidden, and so on.
|
 |
|
|


