|
|
 |
|
"I, Robot" Added on: Fri Nov 17 2000 |
| Page: 1 2 3 4 5 6 7 8 |
First of all, an idea. What do you want and how are you going to do it?
In this case: no idea to speak of, just a few sketches lying around and I'll see how I'm going to do this. Because this is a personal project you have the freedom to make everything up as you go, just take some distance from the project now and then and try to maintain some self criticism.
Although this model is built in Maya 2.5, I'll try to keep it basic so this article can be used for other programs as well (hell, there is nothing fancy about this model at all actually).
The Head
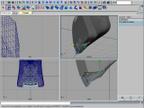
You start by building a spline-cage of the head. I used point-snapping to make sure all lines connected properly, and cut those where they intersected others. When you are satisfied with the shape make sure all parallel running lines have the same amount of cv's by rebuilding them. This makes sure that the nurbs surfaces generated from those splines have a nice and steady subdivision, and this makes it easier to connect them later once turned into polygon meshes.

Once the nurbs-surfaces are created, project circular eye shapes onto the face and trim out the sockets.
Then duplicate the socket curves with "duplicate surface curves", scale them down and move them back into the head where the eyes are going to be. Then loft these curves to create the insides of the sockets.
When all surfaces are in place and shape I turned them into polygonal meshes because I still find nurbs difficult to handle. Connect the different mesh patches by combining them and then merge the multiple vertexes. With a bit of tweaking and cleaning your polygonal head should be finished.
Use a boolean operation to make room for the mouth piece, and fill it up with a simple but seriously tweaked cube as the mouth.
|
 |
|
|


