|
|
 |
|
"Bridges" Added on: Mon Jul 19 1999 |
| Page: 1 2 3 |
After the bridge was completed I started modeling the environment. On the dark side of the image I wanted to visualise a forest with crippled and dead trees.The trees are modeled by TreeFactory Plugin. All three are the same model but each slightly deformed by Bend modifier with different values and direction.
The material for the trees are simple Speckle map in Diffuse/Bump slot kind of a material. Diffuse map uses Gradient Mask map to darken the roots of the trees. Diffuse and Bump Speckle values are of course different from each other. Higher value for Diffuse, lower for Bump.
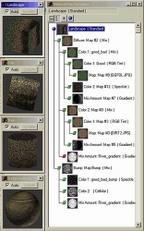
The landscape is a 100*100 segmented box with FFD modifier applied to create the riverbed. Also the model uses Fractal Noise modifier in Z-Axis. The material for the land is a little bit complex one with various Mix maps in diffuse slots (Figure.2 - The Materials).
The dark side of the land uses a Mix map with dirt texture and a solid black tint blended with a Gradient map while the grassy side uses a Mix map with grass and dirt texture blended by a Gradient map.
Finally the dark and grassy sides are mixed by a linear Gradient map to define the riverbed texture. I use all Gradient maps with Noise active. This way I achieve a more random look while mixing or masking the texture maps.
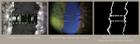
The river is a simple box with Raytrace map in Reflection slot. Raytrace map has falloff value active to create realistic reflections. The trick with the river is that it has a texture map to create the illusion of the foamy parts of water where the poles are meeting the river.
To create this texture map I rendered a Top view of the scene with only the bridge, landscape and water visible. Then used this rendering as reference to paint a texture map over it in Photoshop (Figure.3 - River Texture). This texture is used in Diffuse, Shiness Strength, Shiness and Bump slots of the river material. And by adding several particle emitter objects to simulate the flow of water the illusion is created.
I then placed some stones and rocks near the rive bank or inside the river. All of the stones have a Speckle in Diffuse/Bump slot kind of material. The grass is modeled by the Druid Grass-O-Matic plugin. A free and very efficient plugin for creating grass also with lots of parameters. By the help of this plugin I easily placed grass blades on to the selected faces of the landscape geometry.
|
 |
|
|


