|
|
 |
|
"The Ghost" Added on: Fri Nov 20 1998 |
| Page: 1 2 |
I merged in a semi-accurate body I had previously made in surface tools, cut off the arms and started playing with a bunch of different mapping types. Nothing seemed to look good for the whole thing thought. If it looked good on the legs it didn't look good on the torso, etc.
Eventually just pretty much said fuck the legs, ghosts don't have em anyway, and I cut'em off.
This was a little abrupt though and adjusting falloff settings in the material editor didn't help, so I selected all the lower edges and extruded them down. I ended up using a rotated shrink-wrap UVW map on it and tiled it about 3 times. I wanted a little more texture on it though, like more lines swirling around so I cloned the body and scaled it down as I had done with the arm. This looked good so it was head time.
The head I merged, I had modelled quite awhile ago and put a cap holes on it to close the mouth, and a relax modifier to smooth it out a bit. It also took quite awhile to get an appropriate mapping type on it, and I apparently collapsed the mesh for some reason so I don't remember which mapping method I used :)

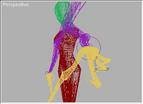
Picture.3
So about this point I had something that looked like this( Picture.3), but I wasn't very satisfied with it, especially because the only part I really liked was the hand. Well I showed it to a few people and one of them suggested the hand be coming towards the camera if it was the only part I really liked.
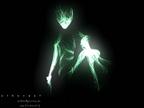
I tried this view, increasing the fov a bit to make it more dramatic. This came out looking pretty good, but still not to my satisfaction. It needed a little extra something, so I selected all the objects, gave them an object id of 1, and put a glow on the whole scene (because at this time I had about 10 materials with different tile/mirroring settings and didnt want to set a materal id for all of them). I played with the glow settings for awhile and finally came up with 20 for the intensity and 8 for the size, in pixel mode. And that was it.
The final image in wireframe and fully rendered is shown below.
|
 |
|
|


