Keep 3DLuVr online!
3DLuVr Logo
Sections
Articles
 From the Real World
 Digital Painting Series
 Featuring of...
 On the Bookshelf
Tutorials
 3ds max
 LightWave3D
 Softimage XSI
 Rhinoceros 3D
 Video Tutorials
FunZone menu
 I always wanted to be
 Talk to an employer
 Why Ask "Why"
TechZone menu
 Hardware Reviews
 Software Reviews
 Benchmarking
 Q&A, Tips & Tricks
UserZone menu
 The Artist Sites
 15 Min of Fame
 Request an Account
 Current Assignment
 Sponsors & Prizes
 Make a Submission
 Voting Booth
 Competition Rules
About menu
 Mission Statement
 Policies
 Advertising
 Comments
 Poll Archive
 Links
 How to IRC
 Donations
Login
Log in to be able to post comments to the news items, forum posts, and other facilities.
Username: 
 
Password: 
Not registered? Register!     Lost Password?
Poll
 Your New Year`s Resolution is...
Gain employment
Stop smoking/drinking/etc
Get back in shape
Find the meaning of life
Conquer the World
Absolutely nothing

    Poll Results
Comments
Want to leave us a comment about the site or in general? Click here to access the form.
ArtZone Heading
Modeling a Mech -Vergos 10
Added on: Sat Apr 14 2001
Page: 1 2 3 4 5 6 7 8 9 10 11 12 13 14 15 

The Head

As with anything, you could do a multitude of different things with the head. Many people prefer a sleek design, and some prefer a more boxy shape. We will do one of each.
First, we will start with a sleek, bullet-shaped head. In Figure.37, you can see the splines drawn for the head. These are interpolated curves.
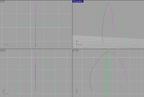

Figure.37


You use interpolated curves because they define smoothness where polylines do not.
Splines of the same color are the same, just mirrored.

It would now be smart to zoom into the top poles of the head splines and check to see if they all come together exactly at the same point. This is important, because if they do not, you will see either a small hole or a twisted spot on the surface. Figure.38 shows the splines at the upper poles before editting.


Figure.38


You can turn on points by using the command ShowCV. The easiest way to get points to be in a certain area is to use object or point snaps. For this surface, we will use point snaps. You can turn on point snaps by clicking osnap button at the bottom of the application, as seen in Figure.39. This figure also shows the check at the point snap.


Figure.39


� 1997-2024 3DLuVrTM (Three Dee Lover)
Best viewed in 1024x768 or higher,
using any modern CSS compliant browser.