|
|
 |
|
Torso From Profile Splines Added on: Sun Sep 03 2000 |
| Page: 1 2 |
You most likely need to edit points now, (otherwise known as CV's) so that the surface looks a bit more realistic, and has more detail. We edited CV's near the chest , abs, and back for a more realistic tone... and also split the surface into several parts to make texturing much easier.
To split parts of surface use the Split command.You will need to draw splines and loft then to make a surface to cut with. Think of your original surface (the torso) as bread, and the new surface (cutting surface) as a knife.
Once split both surfaces will remain and you can now add textures, bump maps, specularity and more.
The terms and buttons of the Loft Dialog Box do the following:
Closed Loft: closes the surface (In this case we do not want to use this.)
Shaded Preview: When quick shade is activated, it shows the current loft in progress in a shaded view.
Do not simplify: Uses the current set of points on a spline to determine where isoparms will be located.
Rebuild with **: Rebuilds a surface using ** number of isoparms (** is a number you indicate).
Style: Determines how your surface will be generated. Normal builds it with normal tightness and so on, while straight sections build a surface with straight sections at each isoparm.
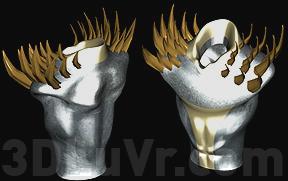
As far as the spikes, they are very simple. You can create them a number of ways. The way
that we have used here is a simple sweep 2 rail tool. This tool in this situation would take a closed spline (such as a polygon or circle) and run it along 2 open splines to make a surface.
|
 |
|
|


