|
|
 |
|
Box Modeling the Basic Shape of a Car Added on: Mon Nov 26 2001 |
| Page: 1 2 3 4 |
Delete one half of the car and Start working on the shapes. Now you might have to move some vertex back so they are placed at the details you had them on in the start because of the FFD.
And you might need to chamfer some edges to make it look good, or you can even weld vertex if it´s like in my case here to many on the front. (remember that the closer or more polys you have the harder it is to get a smooth and soft shape without bumps in it).

Add a smooth modifyer and set it so you get all round shapes in the same smoothinggroup.
Mirror copy the car (you dont need to weld it here) to see the shape better, it´s always good to do this from time to time so you know if youre going in the right direction.
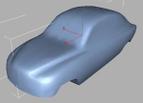
This step is maybe only if youre making a SAAB69, but you can always see it as a tip :)
For adding details like the frontlight I use a Circle with about the same amount of steps as i´m planing to use on the mesh around the lights, this way it´s much easiere to get the round shape right.

Now select all the edges around the doors, windows and other parts. You might need to remove the "edges only" option in the dispaly menu to see all edges you need to select.

Then chamfer the selected edges, but dont remove the selection because you should chamfer the edges one more time to make it look like the pic below.
|
 |
|
|


