|
|
 |
|
Making of BMW Z3 Added on: Mon Nov 13 2000 |
| Page: 1 2 3 4 5 6 7 8 9 |
Vehicle Background
When the Z3 was introduced back in 1996 many were shocked by the aggressive styling of this German 2-seater. Everybody thought then that the Z3 is a very beautiful car to say the least.
Late 1999 brought a slight facelift of the back end and the back wheel arches.
I love these pieces, stand next to one of the tiny lil things and you start thinking you can pick it up! The Z3 has proved to be an instant classic. The type of car that would sell even without an engine!
Beginning
I hope you gave my other tutorial "The making of an Audi TT" a try because this is a step up from that and if you pulled the TT off then you can certainly do this. Just takes a bit longer since this is a more complex car.
As always, if you do run into a problem or I have not been clear enough in a certain area of the tutorial then feel free to email me. The picture above shows my Z3 as it is now, still a lot to do on it but body done. Talking you through all the body would be a very long task so prepare to think for yourself at certain points.
Disclaimer: This is how I made my Z3 and is by no means the only way / right way to go about the task.
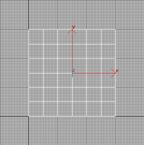
First you start off going to the Create->Geometry->Patch Grids menu and choose Quad Patch. Create a Quad Patch with a width of 3 and a length of 3 in the left viewport. You should now have this in the Front viewport:
Head on over to Thomas Suurland's website and find a Z3 in his blueprints section. Save the file. I am using bmw-z3-roadster-18.gif
Get the blueprint into a viewport background. There are other ways of doing this which are more accurate but take more time.
Select a viewport (eg left would be a good choice) press Alt+B (Viewport background screen pops up) Under Aspect Ratio select Match Bitmap and tick Lock Zoom/Pan look up and click the Files button (find your blueprint) double click and then press OK.
When you get back in the Viewport Background screen Right click on the viewport label (the one saying the viewport name) and then untick Show Grid. Use min/max toggle to make that viewport fill the screen (take note depending on your system if you zoom in too close max starts asking for more memory.
|
 |
|
|


