Keep 3DLuVr online!
3DLuVr Logo
Sections
Articles
 From the Real World
 Digital Painting Series
 Featuring of...
 On the Bookshelf
Tutorials
 3ds max
 LightWave3D
 Softimage XSI
 Rhinoceros 3D
 Video Tutorials
FunZone menu
 I always wanted to be
 Talk to an employer
 Why Ask "Why"
TechZone menu
 Hardware Reviews
 Software Reviews
 Benchmarking
 Q&A, Tips & Tricks
UserZone menu
 The Artist Sites
 15 Min of Fame
 Request an Account
 Current Assignment
 Sponsors & Prizes
 Make a Submission
 Voting Booth
 Competition Rules
About menu
 Mission Statement
 Policies
 Advertising
 Comments
 Poll Archive
 Links
 How to IRC
 Donations
Login
Log in to be able to post comments to the news items, forum posts, and other facilities.
Username: 
 
Password: 
Not registered? Register!     Lost Password?
Poll
 Your New Year`s Resolution is...
Gain employment
Stop smoking/drinking/etc
Get back in shape
Find the meaning of life
Conquer the World
Absolutely nothing

    Poll Results
Comments
Want to leave us a comment about the site or in general? Click here to access the form.
ArtZone Heading
Methods to hide mesh seams in realtime engines
Added on: Sat Jul 03 2004
Page: 1 2 4 5 6 7 8 

Method 1: Keeping the normals

First way

According to the Max help, this can be done by breaking up your mesh, selecting all the parts and then applying an Edit Normals modifier and selecting the normals across the seam, and then just hitting Unify. This has never worked for me. If someone knows why, I'd love to hear. I can only presume it's a bug in Max 6... If this worked, these other workarounds wouldn't really be necessary.

Second way

The next way to do this is the easiest by far, and also the quickest for setting up. In order to do it, you will need a script written by Maurizio B.G. The script is called Normal Thief 1.0, just do a search for Normal Thief and you should find it at that link.

Now to use it...

Install it, and launch it with Max script in the Utilities tab. You should get the following dialog:

Normal thief dialog - click to view larger

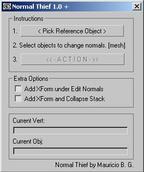
Click on image to view larger

Now we need to duplicate our original mesh, and cut it up by selecting faces and detaching them as we see fit. The important thing here is that these meshes do not move away from their original location in the scene, (they should still be located directly on top of the original mesh)

Once done, we click on , select the original mesh (press H on your keyboard to get the Select dialog up), then we select our new meshes (all the cut up meshes), and click Action on the Normal Thief dialog.


� 1997-2024 3DLuVrTM (Three Dee Lover)
Best viewed in 1024x768 or higher,
using any modern CSS compliant browser.