|
|
 |
|
Spline + Subdivision Head Modeling Added on: Sat Aug 30 2003 |
| Page: 1 2 3 4 |
Now press �2� to go to the edge editing mode (1= vertex, 2= edge, 3= border, 4= polygon, 5= Element), and under �Subdivision Surface�, click on �use NURMS Subdivision� and set Iterations to 1. Now what you have is the simple cage to work on in orange, and the smoothed polygon below it, so that you can see how the final model looks like as you edit it.
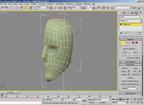
There is a harder way to do this, by copying the poly object as an instance then only applying the NURMS sub-d to the second poly, then apply a wireframe material to the first object and use it as the editing polygon. I actually like this method better because I can scale the editing polygon slightly so that I can view the pre-smoothed version easier.
It is also a good idea to mirror the smoothed polygon as an instance, so that you can see both sides as you work on them.
Now it�s a matter of personal artistic decision. What I have to suggest are ways to build the topology of the face so that it animates well, keeping the wireframe clean. It is important at this level that you understand how sub-division works, and how it modifies each edge and polygon.
In my case, I decided to start by defining the eyes. Put as many vertices as you want on the eye, but remember that each one of those vertices means a new �loop� of edges, and in order to keep your model clean, you will need to close every polygon to a max of 4 faces. A few 3 or 5 sided polygons won�t hurt, but those tend to be kind of messy and not so intuitive to work with. A tip is to constantly go from wireframe to shaded view and vice-versa by pressing �f3�.
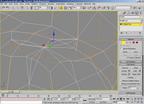
Follow by adding the vertices to the other features of the face like the mouth and nose, shaping the side and front views until you are happy with the lines. Don�t go crazy with the vertices, it is always better to add as few as you can vs. the amount necessary to hold the shape.

|
 |
|
|


