|
|
 |
|
"The Ghost" Added on: Fri Nov 20 1998 |
| Page: 1 2 |
When I first started this thing all I had was the idea for the hand, with the fingers really extended out and kind of ethereal looking.
Originally my idea was to have the view from the side looking at it touching something,
but I changed that later. So I first started out with the material.
In the diffuse and opacity slots I loaded up a map I had made in photoshop a while ago, which was inspired by the lifestream cgi in FF7 (Picture.1).
Then I set the self-illumination to 100 and set the filter type to additive.
Picture.1
Once I had the material done I started on the modeling. Since the only idea I had was for the hand, I decided I'd better start with that before the idea left my mind.
So I started by lofting a circle across a path of the index finger stretched out as I had imagined, and put a loft scale deformation on it to make it look kinda skinny/bony/sharp (Picture.2), and I made it extra long knowing the large black area of the opacity map would make it look shorter.
I played with tiling/mirroring/offseting of the texture until I got it looking good and then cloned the finger and the original loft path. After getting the cloned loft path as the path for the second finger, I edit spline'd it around until it was more curved underneath the hand.
Then I shift+rotated a few copies of this for the rest of the fingers and rotated/scaled them to size approriately.
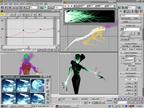
Picture.2
After I had the hand done I decided to do the arm, which I also lofted. Because of the bright edges of the hand, it was important that I texture the arm with the bright end at the wrist instead of at the shoulder. The arm also gave me some trouble because of the large mostly-black area of the texture.
Instead of cropping it in the material editor and cutting off some of the texture I just made the arm extra long (as you can see (Picture.2) it extends way beyond the shoulder), but I figured I could get away with a lot of modeling flaws using this texture. It looked kind of empty so I ended up cloning it and scaling it's shape down, sort of like a bone or something inside of it. So once I was satisfied with the tiling and stuff, I grouped it with the hand and decided I should probably add a body.
|
 |
|
|


