|
|
 |
|
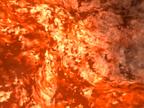
Procedural Shaders: Update on Lava Added on: Sat Dec 14 2002 |
| Page: 1 2 3 4 5 6 |
In the article Procedural Shaders: Magma/Lava Effect I wrote back in 2000, I roughly explained how I created a magma shader, but unfortunantly during that time I didn�t really have any free time to really focus on it. So the article became a bit hard to follow, plus my shader was a lot more complicated than necessary. This new shader however is as efficient as it can be and shouldn�t create and confusion.
What I plan to accomplish in this tutorial is showing the power of procedural shaders and masking as well as trying not to make it too confusing at the same time. You�re first going to need 3dsmax of course, but you�re also going to need a freeware plugin called electric, it�s a procedural texture map from Blur Studios, you�ll also need blurlib which is pretty much required for electric to work. You can grab both of these below:
Electric Blur Studios
Blurlib Blur Studios
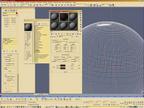
First of all create a sphere, give it 200 segments so later when we displace the geometry it�ll have enough segments to form the contours of the rock surface we�re going to create.
Once you�ve created the sphere load up the material editor, pretty much all of what we�re going to do now is through the material editor. Choose a new blank material to start fresh and clean with. To start off we�re going to create a fairly simple rock surface which will be the base of the surface before it cracks apart revealing lava underneath. First we�ll make a diffuse map to give a bit of colour alteration to the surface. So click on the diffuse slot under �maps� and when the map navigator window pops up choose noise from the list of map types.
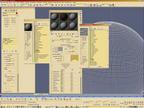
Once you�ve chosen noise as the diffuse map, the material editor will display the noise maps� parameters. Keep the size on 25 but choose Fractal as the pattern instead of Regular. And then click on Color #1 color box to bring up the colour palette (it�s the black box) and type in the RGB values Red: 42, Green: 32, Blue 24. Click on the colour #2 box directly below and change it�s colour values to Red: 66, Green: 49 and Blue: 40.
This gives the surface colour more of a brown dirty look which is what we�re trying to achieve.
|
 |
|
|


