|
|
 |
|
Compositing: Advanced compositing at a smaller scale Added on: Sat Dec 14 2002 |
| Page: 1 2 3 4 5 6 7 |
Now this is a rather simple thing, that can be very handy, I'll show you another example below of it's use.
 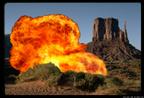
Fairly rough mask, but it shows what kind of effects you can get with it, for instance doing that in a fairly flat but still long grass yard with an explosion can really show the radius and size of the explosion, animating these masks could make it grow further out and in again ect.
Very cool stuff. But in 3D you can really make elements work a lot better, with shadows being casted and received on background objects and things able to move or get wet, burn, or break there's plenty more life you can give to your scene. Now here's where I get really max specific.
3D Matting materials
Within Max there are many different tools and techniques and key features which you can use to get specific effects done. When you create your geometry it will look like a pink, green, red (or whatever colour you chose) object. Not exactly a matted object now is it? Now there's specific materials you can apply to your scene to make these objects become part of the background. So load up your material editor and lets get cracking!
Screen mapping: This technique is the very basic one but can be very useful at times. The way this is used is to select your bitmap from the material editor, and then under the coordinates section of the bitmap panel, you can select either 'texture' or 'enviro' (environment).
If you choose environ then you can select from spherical, screen, cylindrical ect. If you choose screen and apply it to the object, it instead of mapping it 'around' the object, it maps it to the screen. So wherever the object is in the screen it takes on the texture from that area of the screen. So make sure your object doesn't move at all! Try applying this material to your object.
Now by default your material will have gloss on it, so your surface will probably be shiny, you may want to fix this up. The second advantage/disadvantage of using screen mapping is that it picks up lighting, so if your lighting isn't exactly correct then the objects are going to look wrong. You can however fix this up by adjusting the self illumination up to 100% but the disadvantage of doing this is it won't receive any shadows, nor will other lighting effect it ect. since essentially it will be 2D.
So it's best to adjust the lighting to match the scene since you'll have to anyway if you want your other 3D objects to look realistic. The other thing is you'll have the option to use bump mapping, it's really up to you, it will probably look more realistic to use it, or make a custom bump map for it.

|
 |
|
|


