|
|
 |
|
Compositing: Advanced compositing at a smaller scale Added on: Sat Dec 14 2002 |
| Page: 1 2 3 4 5 6 7 |
  
Back to the above images, the first one is a grey background image of a desert and a ball. This imaage we're going to comp the teapot over. If you look at the next image it shows the teapot, the alpha and the background, you can see the way they work, the first image is the teapot, the second is the alpha it's using as the transparency, the next image is the background which it'll sit on.
Notice the teapot is at the front, the background is at the back, and the alpha is what the teapot will read to know where it's transparent and opac. The next image is the teapot composited over the desert image (I did howerver put a shadow in for this which you won't get but I'll show you how to do that later. Keep looking at these images and make sure you understand what's happening first before you continue on any further.
Compositing in 3D
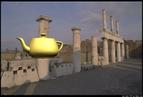
First of all download  pillars.zip and load up pillars.max included inside it. Also use the plate image included (pillars.jpg). Take a look at the file. Here's where I'm going to explain the concept of compositing 3D elements with what was shot on a camera. In this scene I've already matched the camera and geometry up to the scene and roughed out the lighting. Click on the two images below for a render of the scene. pillars.zip and load up pillars.max included inside it. Also use the plate image included (pillars.jpg). Take a look at the file. Here's where I'm going to explain the concept of compositing 3D elements with what was shot on a camera. In this scene I've already matched the camera and geometry up to the scene and roughed out the lighting. Click on the two images below for a render of the scene.
 
In this scene if you create an object or select the teapot and move it behind one of those pillars, rather than sitting on front of the pillar image like it would without the plates geometry there, it actually goes behind the pillars.
When it comes down to it there's only two types of 3d compositing, there's compositing with geometry (like above) and then there's using 2D masks to composit. Such as below. This was painted in photoshop as a seperate layer over the photo, it's called a lumience mask, which basically is a hand drawn alpha.
Now if I use this image on the below rendered image, it will tell the white areas to be protected from the 3D elements, but the background can be effected.
|
 |
|
|


