|
|
 |
|
Simulating DOF in 3DSMAX Renders Using Photoshop Added on: Wed Nov 28 2001 |
| Page: 1 2 3 |
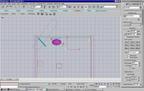
Now you need to put the black material on everything in your scene except the reflective surface which will have the white material. If you have more than one reflective surface as i have you will need to create a seperate render for each of these surfaces. These renderings will be used as masks. This is an example of the rendered mask for the mirror
We need to create two images for the DOF effect. 1st put the black material on all the objects. Turn on fog in the environment settings and configure your camera so that its "Far Range" is within your scene at a desired distance of where you want the blur to be full in the distance. The "Near Range" needs to be left at 0.
Save this render as "DOF ALL". Now apply your reflective surface material to your reflective objects yet make sure the reflections is at 100% full reflective with no color tint. It will now be apparent why we are using the fog for the depth greyscale instead of the z-buffer seeing as how the fog is reflected in the mirror. Save this file as "DOF Ref".
 We are now finished with the 3D Studio part of the tutorial and head over to photoshop. We are now finished with the 3D Studio part of the tutorial and head over to photoshop.
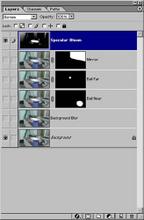
Open your diffuse image and in the Layers section i have duplicated my background layer 5 times. I have named them "Background blur", "Ball Near", "Ball Far", "Mirror" and "Specular Bloom".
On the layer for each reflective surface i have created a mask and pasted the corresponding mask image into that layer's mask.
Moving to the Channels tab i create two new channels which i title "Fog Reflect Main" and "Fog Scene Main".
To save me headaches I just made work duplications of those channels. After all images have been pasted into this document I cropped off the top and bottom watermark from the image so that it would not interact with the what we are doing.
If your goal is to blur out the distance then you might want to skip ahead a few steps however I wanted both foreground and background to be blured so i had to alter my depth greyscale image. To do this i need to go into Image->Adjust->Curves.
|
 |
|
|


