|
|
 |
|
Guide to Making a Polygonal Head with NURMS Added on: Wed Jan 10 2001 |
| Page: 1 2 3 4 5 |
All the other views can wait until its time to refine what you have pulled out. Also, this is really good for giving you more real estate to work with on the screen.

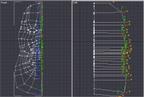
Vertices of edge all selected for the purpose of pulling out.
The next method is somewhat tricky. What I like to do is to select all the vertices that make up the right edge of the face (I always use my Front viewport for selection, and left viewport for pulling.(see image above)).
Once they are all selected, I switch to my left viewport, and pull out the selected vertices using only the X axis. That way, when you pull them, you will not lose the structure of the face.
When you have done this, stay in the left viewport and form the side profile of the face by pushing and pulling the vertices...again, using only the X axis to do so.
Vertices on left viewport are formed to create the character's profile.
Once I have everything pulled out accordingly, I then apply a Surface modifier with the Steps set at Zero. Working with the viewport set to Smooth & Highlights and Edge Faces is a habit for me whenever I'm working on complex meshes. Edge Faces on lets me see the actual contours of the wireframe which, in turn makes it easier to modify.
If everything is in place and ready to go, it's time to collapse the surfaced spline cage, and turn it into an Editable Mesh.
Remember, it is very important to leave the Steps under Surface Parameters to zero since that is what we need to go by after we turn this thing into an editable mesh.
|
 |
|
|


