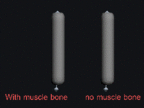
Please note that I'm using 3dsmax version 5.1 but it would apply to 6 and later for sure and I think even version 4. Well, let's get to it and hopefully this will be helpful. :-) To illustrate the use of "muscle bones" we'll create a simple arm-cylinder with one bicep muscle. Below is an image of the same set-up. One with a muscle bone and the other without
Ok, so let's quickly make a cylinder arm for us to add the muscle to. If you already have an arm or some kind of limb and just want to add a muscle, you could skip this and go straight to muscle making. Or you could download this max file of an "arm" without muscle bone and skip to muscle making part. 
So, for a simple arm, just make a cylinder about 14 in Radius, 145 in Height, 8 Height Segments, 1 Cap Segments and 8 sides. Once you have that, make your arm bones so that it looks like in the picture below.

Make sure that the bones are inside the cylinder. Name the top bone "bicep" and the lower bone "forearm". Name the last diamond looking end bone "arm_endbone". Now add Skin modifier to the cylinder and Add the first 2 bones (bicep and forearm) to the Skin modifier. Don't add "arm_endbone" to the skin modifier, you don't need that. Adjust your envelopes so that the "arm" bends nicely. An image below will show what my envelopes look like. I won't go in to detail on envelope adjusting here. There are plenty of tutorials on that. I just want us to have a quick "arm" like thing to add "muscle bone" to. Once you got that "arm" add Meshsmooth on top with one or two iterations.

|


