|
|
 |
|
Lighting, Texturing, Rendering in 3DSMAX: Part 2 Added on: Sat Dec 14 2002 |
| Page: 1 2 3 |
I call it sub-maps because we use our current Noise map as a mask to mix underlying maps, all to create a more complex look. Now, map the black color of our noise with another noise map. The size of this map should be smaller to pick up some smaller details.
Also change the Noise type to Turbulence. This will result in a different looking Noise, and the final map will appear more irregular. Set the colors for this map to dark greys, not so much difference between the values.
Back to the base map... Create a Cellular map for the white color channel. I'm using this map to bring even more irregularity into the mix. Change the size to a smaller value and the cell type to Chips.
In order for our beautiful bump map to be seen properly we need to crank the bumping up a little. Bring the Amount of the Bump channel up to about 100.
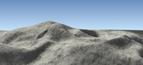
That is pretty much it... press render and you should get something like this:
The other maps (diffuse, specular) should be made in similar ways, use variations of the existing map. The diffuse (color) map probably needs most work since it's the most obvious of the three... a good idea is to pick a color palette before creating any diffuse maps.
The Speculars
When a surface reflects a lightsource, a highlight is created. To save rendertime, MAX simulates this by creating a fake highlight that comes close to the real thing... it's close, but not close enough. If we were to create a realistic scene, we would raytrace the reflections and actually build the lightsource as a geometry.
I can recommend reading Hans Sjunnesson's tutorial: Faking Window-Shaped Highlights to understand what I'm talking about. I will not go deeper into this subject in this tutorial, but I will give some tips on how to get the best out of MAX's highlight simulations...
1. Try not to use large, unmapped speculars. In my opinion, MAX's speculars are the biggest reason to the BS' look...
2. Map your speculars. Even if a shiny surface seems smooth and even, it isn't. The human eye picks up small variations of the shinyness, even if we can't put our finger on where the variations are...
3. Always use the Raytrace material when you need materials with good speculars. It creates the smoothest, most realistic shading.
4. Specular color shouldn't be the default white color, but a brighter version of the materials diffuse color.
5. If you have budget for longer rendertimes, turn Supersampling on. Supersampling smoothens speculars and bumps out, makes for better result.
|
 |
|
|


