|
|
 |
|
Creating Fire in 3DSMAX Added on: Mon Jul 09 2001 |
| Page: 1 2 3 4 5 |
Next off lets change some of the particles properties to make it act and look how we want it to.
  Select the wind and go down the stack to the parray's properties. First of all under 'Particle formation' click on the checkbox for 'At Distinct Points' and type in 25. This way rather than emitting from allover the object it will emit from only 25 random vertices, we want this to happen so it continues to emti from the same areas so the particles stick in the same kind of formation. Select the wind and go down the stack to the parray's properties. First of all under 'Particle formation' click on the checkbox for 'At Distinct Points' and type in 25. This way rather than emitting from allover the object it will emit from only 25 random vertices, we want this to happen so it continues to emti from the same areas so the particles stick in the same kind of formation.
Move down to 'Particle Generation' and click on 'Use Total' and change the number to 1000. Change the speed to 0 since we're going to use the wind to control the movement of it.
Now change the emit stat time to -10 so it doesn't begin emitting from frame 0 but instead is already emitting fire. And change the display until and emit stop to whatever your last frame of the animation may be, by default it should be 100. I've set mine to 150 just so the animation goes for a bit longer.
Now change the life to 35 so each particle emits and dies after 35 frames. Go down a bit more and change the particle size to 7.0. What we want is for the particles to basically be the size of 7 but as they emit they slowly shrink down until they disapear so change the 'Grow for' value to 1 so it grows up to 7.0 over 1 frame and change the 'Fade for' value to 25 so it shrinks for the last 25 frames of the particles life.
  Go down to 'Particle Type' and click on the 'Facing' checkbox so each particle is a face that always faces the camera rather than the triangle it was on by default. This is basically just the shape and geometry of the particles emitted from the object. Go down to 'Particle Type' and click on the 'Facing' checkbox so each particle is a face that always faces the camera rather than the triangle it was on by default. This is basically just the shape and geometry of the particles emitted from the object.
Lastly go down to the 'Rotation and Collision' rollout and change the 'Spin Time' value to 25. Now the particles will rotate as they emit giving them a bit of a rolling fire feel to them.
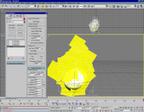
If you want to see now what the particles geometry looks like, scroll back up to the 'Basic parameters' area and click on the 'Mesh' checkbox under 'viewport display' so this way it shows what the particles look like in the view.
|
 |
|
|


