|
|
 |
|
An Industry Lesson Added on: Sat Dec 14 2002 |
| Page: 1 2 3 4 5 6 7 8 |
We'll now go into the material editor and make a basic material for the dust. So load up the material editor and start a new material. First off go to the dffuse colour and adjust the colour to brown.
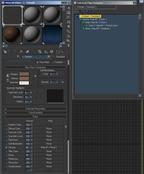
Go down to the opacity slot and click on the empty box, choose a mask material and then click on the first material (the map one) and make this a noise material. Adjust the size to 35 and the type to fractal. Click on the white colour's slot and choose a particle age material so we can make the material fade off over it's lifetime, drag the white colour box onto the black one and click on swap when the pop up menu appears, this way it starts out white (dense) and fades to black (totally transparent).
Go up two levels back to the mask and click on the mask and make this one a gradient map. Change the type to radial so it's round oposed to linear, and drag colour #2 (the grey one) onto colour #3 (the white one) and choose copy. This will make both colours on the inside grey so they're half transparent.
Under noise change the amount to .2 and the size to 3.5 and the type to fractal so it roughens up the perfect radial shape. Okay, go back up to the top level and adjust the opacity value up the top of the material to 0 (this won't effect anything since we're using a map, but if we drop the opacity material's value it will fade oposed to rely on the universal opacity value we're changing now.
Now adujst the material slots value down to 40 oposed to 100 so it's a little more transparent. This is easier to do here since we can adjust it on the fly oposed to managing two colours. Now up the top make the material a Face Map material so the facing particle type works.
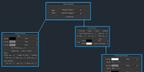
Insert the settings for each map and the name above it. sort it out as a tree, as well as the head material screen.
Render a frame of the particles after they emit and have a look and see if you're happy with them. Now from here (assuming you love your particles!)
It's time to dupe the dust, so select your grid and your wind and particle system and hold down shift and move them onto the next block on the road and click on OK when the copying window pops up.
|
 |
|
|


